
How to Configure MongoDB on Ubuntu Server 16.02 & 18.04 and Tweaking it to Connect Locally as well as Remotely.
First thing first, Check your System Requirements before installing MongoDB on your System.
Operating system
- Ubuntu 16.04, 18.04, 18.10 (excluding Ubuntu 19.04)
This method doesn’t work on Microsoft Windows or
~ 64 bits support only.
CPU
System Requires at least 2 CPUs (the more the better) for good user experience.
RAM
- At least 2 GB of RAM for testing purposes
- 4 GB of RAM for moderate traffic
- 16-64 GB RAM or more for high traffic servers
Note – that you may need different installation methods like sharding, to distribute traffic to several servers, for multi-billion API requests per month.
Disk
Requirements for disk depends on the number of events and segmentation’s you send to your server.
- At least 20GB of disk space for testing purposes or low-traffic servers
- At least 100 GB of disk space for moderate traffic
- 1 TB or more for high traffic servers (SSD recommended)
Now You have seen System Requirements, Now let’s begin the installation on your Server.
Run the Below the Command’s to Install and Configure the MongoDB on Your Server.
1.) Login into your Server with root user.
2.) Check Your OS Version, if below Command show the output Ubuntu Version 16 or 18, you can proceed further.
# cat /etc/os-release3.) Update the packages of your Server.
# apt-get update -y# apt-get upgrade -y4.) Now lets Import the Public Key.
# sudo apt-key adv --keyserver hkp://keyserver.ubuntu.com:80 --recv EA3129275.) Now we need to create the Source List File for MongoDB its like adding the Repo for MongoDB So we can Install it in the server.
Create a MongoDB list file in /etc/apt/sources.list.d/ with this command:
# echo "deb http://repo.mongodb.org/apt/ubuntu "$(lsb_release -sc)"/mongodb-org/3.2 multiverse" | sudo tee /etc/apt/sources.list.d/mongodb-org-3.2.list6.) Now over Next step will be updatin
# apt-get update7.) Don’t
# apt-get install -y mongodb-org8.) Now Let’s Begin with MongoDB, Start MongoDB Service.
# systemctl start mongod# systemctl enable mongod #systemctl restart mongod9.) Now first Lets Connect Locally, run below command in your server.
# mongoThe output will be like this, means you successfully connected to your MongoDB locally.

10.) Now lets Configure our Server to Connect it remotely, from another location, use below commands.
> Check IP Address of your Server.
# ip a
> Also Make Sure to allow Default Port of MongoDB (27017) in your Server Firewall.
If you have iptables running on your Server run Below Commands.
# iptables -I INPUT -m tcp -p tcp --dport 27017 -j ACCEPT# iptables-saveTo list the rule in iptables run below command.
# iptables -L
If you have ufw installed in your Server run below Commands.
# ufw allow 27017/tcp# ufw allow 27017/udp# systemctl restart ufwTo list rule in ufw run below command.
# ufw status verbose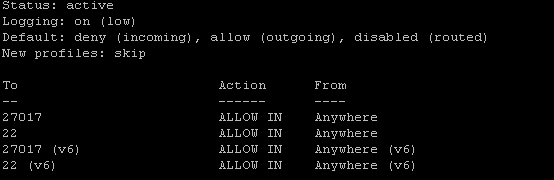
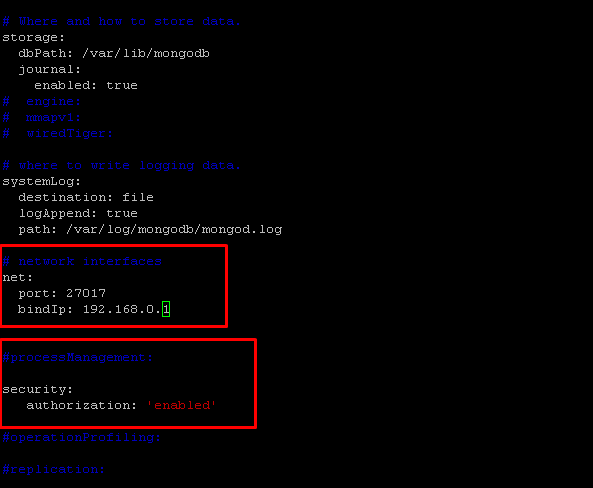
> Now Let’s go to the
# vi /etc/mongod.confchange bindIP: 127.0.0.1 from bindIP: 192.168.0.1 (Your Server IP Static or Private)
Also un-comment the Security line and type authorization: ‘enabled’, this will make sure that your MongoDB Server Doesn’t Connect Without
Save the file and restart the mongod service in your server.
# systemctl restart mongodNow let’s Connect remotely
# mongo 192.168.0.1:27017
And That’s it.
NOTE- if we disabled the security option from file /etc/
BONUS INFO :-
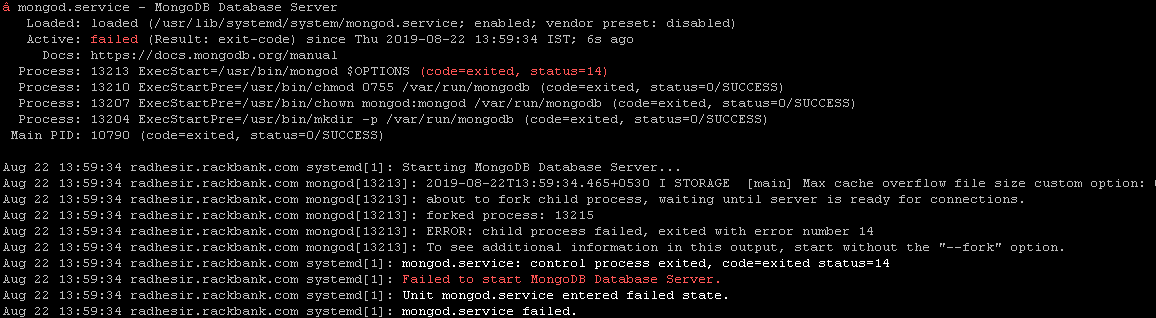
After Changing the File /etc/mongod.conf you need to restart mongod service to make the current changes live, Sometimes mongod service will fail after restarting the service, below is the output.
In this Situation you just need to rename the .sock file which have been created in /tmp directory , use below Commands.
# cd /tmp# ll
You will see.
# mv mongodb-27017.sock mongodb-27017.sock.bak
As you can see we have renamed the
# systemctl restart mongod# systemctl status mongod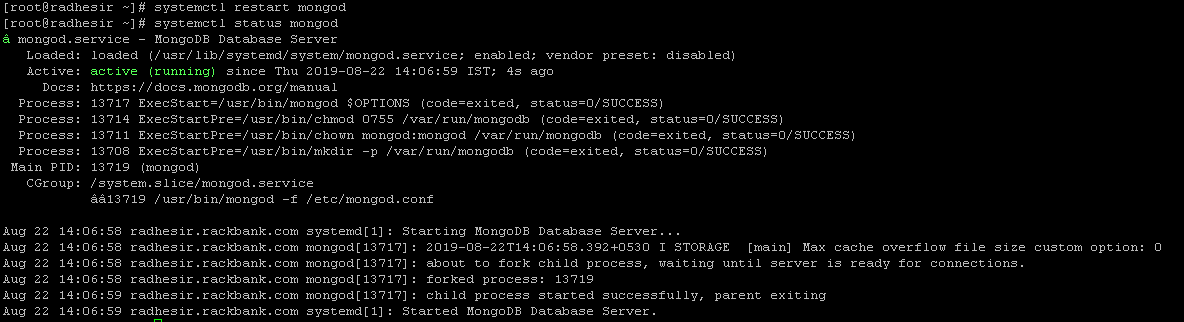
Have a nice day 🙂


Leave a Reply